Guide to the Dumbbell Skull Crusher
Written by the Boostcamp staff
Blow up your triceps
The dumbbell skull crusher is one of the most effective exercises for targeting the triceps, specifically the long head of the muscle. It isolates the triceps while allowing for a greater range of motion than some traditional pressing movements like the close grip bench press. While this exercise is often referred to as a "skull crusher," it’s vital to focus on form and technique to ensure you’re building strength and muscle effectively while avoiding injury, or actually crushing your skull.
Our team at Boostcamp has put together an expanded guide that covers everything you need to know about the dumbbell skull crusher, from execution to advanced tips and variations.
What is the Dumbbell Skull Crusher?

Image courtesy of Testosterone Nation
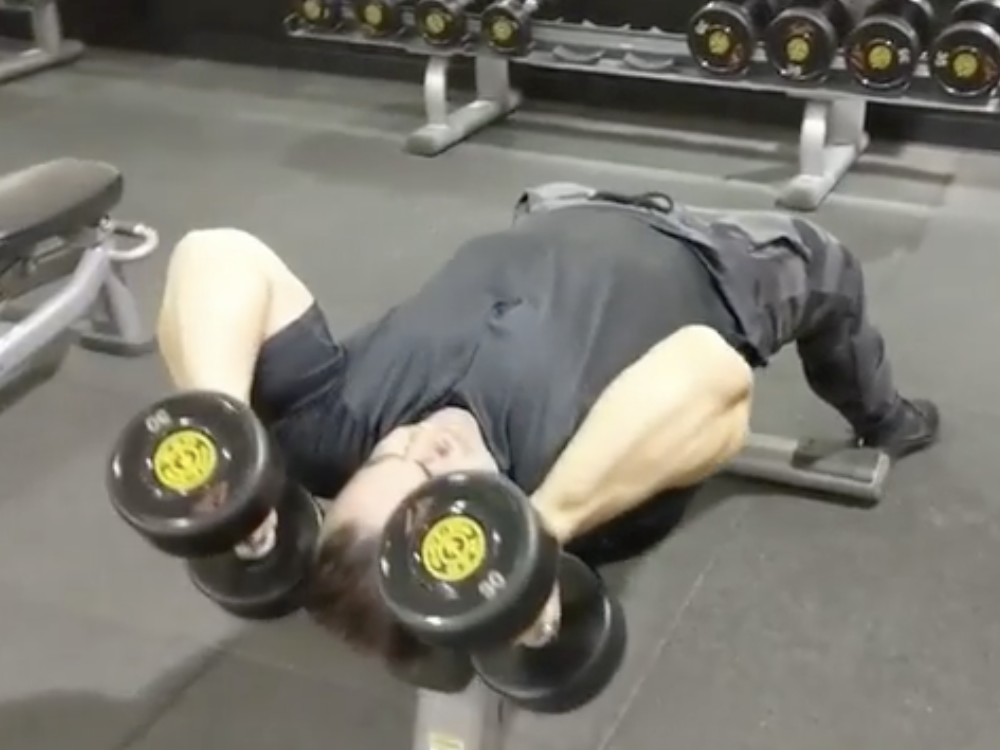
The dumbbell skull crusher is a tricep isolation exercise that involves extending your arms overhead with dumbbells and then bending your elbows to lower the weights toward your forehead (or slightly behind the head). The movement targets all three heads of the tricep muscle, but particularly the long head. It helps to improve arm definition, strength, and functional performance for pushing movements.
The reason the dumbbell version is preferred by many lifters is that it allows for a more natural movement path compared to the barbell version, where the hands are fixed. Dumbbells allow for wrist rotation, which can alleviate stress on the joints.
Why Should You Do the Dumbbell Skull Crusher?
Targeted Triceps Development: The triceps make up a significant portion of the upper arm, and strengthening them can improve overall arm size and definition. The skull crusher emphasizes the long head of the triceps, which contributes to the upper arm's bulk and shape.
Improved Pressing Strength: As triceps play a major role in pressing movements like bench presses, your overhead presses, and push-ups, strengthening them will improve performance in those exercises as well. Stronger triceps contribute to more pressing power and greater overall upper body strength.
Versatility: The skull crusher can be performed on a variety of benches (flat, incline, or even decline), each offering a slightly different angle of stimulation for the triceps.
Reduced Joint Stress: Compared to the barbell skull crusher, the dumbbell version provides more freedom for the wrists and elbows, which can reduce joint discomfort and increase the comfort level during the exercise.
How to Perform the Dumbbell Skull Crusher
1. Set Up Your Position
Bench Setup: Choose a flat bench, incline bench (set at a 30-45° angle), or a decline bench. For beginners, starting with a flat bench is ideal, but as you progress, an incline or decline angle can help target different portions of the triceps.
Grip the Dumbbells: Hold a dumbbell in each hand with a neutral grip (palms facing each other). Press the dumbbells directly above your chest, ensuring your elbows are bent at around 90 degrees and your upper arms are perpendicular to the floor.
Feet and Core Positioning: Place your feet flat on the floor for stability, and engage your core muscles. Having a stable core and legs will help you control the movement and prevent any unwanted rocking or arching of the back.
2. Lower the Dumbbells
Controlled Descent: Slowly lower the dumbbells by bending your elbows. Keep the elbows tucked in toward your head, ensuring they don’t flare out to the sides. The goal is to lower the dumbbells to just above your forehead or slightly behind the head.
Full Range of Motion: Lower the dumbbells as far as your flexibility and shoulder mobility allow, aiming for the forearms to become parallel to the floor or just slightly past that point.
Pause at the Bottom: When the dumbbells are close to the forehead or behind the head, pause for a second or two. This brief pause increases muscle tension and helps recruit more muscle fibers for growth.
3. Press Back Up
Drive the Elbows Up: Press the dumbbells back up by straightening your arms. Focus on using your triceps to move the weights, keeping the rest of your body still. The triceps should feel the primary contraction at the top of the movement.
Control the Ascend: Don’t jerk the weights up; instead, keep the movement smooth and controlled. The goal is to maintain constant tension on the triceps throughout the entire exercise.
4. Common Form Mistakes to Avoid
Elbow Flaring: Allowing your elbows to flare out to the sides can shift some of the work from the triceps to the shoulders and chest, making the exercise less effective. Keep your elbows pointing forward and in line with your shoulders.
Using Too Much Weight: Overloading the movement with heavy dumbbells may cause your form to break down. It’s better to use a moderate weight that you can handle while maintaining good form throughout the set.
Jerky Movements: Avoid swinging or jerking the dumbbells. Instead, use controlled motions both while lowering and raising the weights. The triceps are best engaged when the movement is slow and deliberate.
5. Breathing Techniques
Inhale: Breathe in as you lower the dumbbells toward your head. This is when the triceps are stretched and under tension.
Exhale: Breathe out as you press the dumbbells back to the starting position. This is the concentric phase of the movement when the triceps are contracting.
Advanced Tips and Progressions

Image courtesy of athletic.999
1. Progressive Overload
To continue building strength and size in your triceps, you must gradually increase the weight, reps, or sets over time. If you’re able to complete 3-4 sets of 12 reps with a particular weight, it’s time to increase the dumbbell weight by 5-10% and aim to lower the reps to around 8-10. As you become stronger, progressively increase the volume and challenge your triceps.
2. Tempo Training
Manipulating the tempo (the speed at which you perform the reps) is an effective way to increase time under tension and stimulate muscle growth. Try slowing down the eccentric phase (lowering the weights) to 3-5 seconds, focusing on maintaining control and tension on the triceps. This will increase the difficulty and help you push past plateaus.
3. Elbow Support and Stability
If you find it difficult to keep your elbows in a fixed position, you can place a small towel or cushion under your upper arms to help maintain a steady, non-moving position. This can help prevent your elbows from flaring out, which could diminish the effectiveness of the exercise.
Variations of the Dumbbell Skull Crusher
1. Incline Dumbbell Skull Crusher
Performing the skull crusher on an incline bench shifts the emphasis to the upper portion of the triceps. The incline variation targets the triceps from a different angle, helping to provide a more balanced workout for the entire tricep muscle. The increased angle also recruits the shoulders slightly more.
2. Overhead Dumbbell Tricep Extension
While the skull crusher targets the triceps primarily through elbow flexion and extension, the overhead dumbbell tricep extension provides a different angle of resistance. Holding one dumbbell with both hands overhead and lowering it behind the head before pressing it back up can help target the long head of the triceps more effectively.
3. Dumbbell Close-Grip Bench Press
Another variation that complements the skull crusher is the close-grip bench press. While not exactly the same exercise, it emphasizes the triceps in a pressing movement, which works well for building overall tricep strength in combination with skull crushers.
4. Dumbbell Tricep Kickbacks
Though not as isolated as the skull crusher, tricep kickbacks are another effective dumbbell tricep exercise. By bending forward at the waist and extending the arms behind you, you can target the triceps from a different angle.
Sample Workout for Tricep Development
To incorporate the dumbbell skull crusher effectively into your arm training routine, try combining it with other tricep exercises:
Warm-up: 5–10 minutes of light cardio and dynamic arm stretches.
Dumbbell Skull Crushers: 3–4 sets of 8–12 reps.
Tricep Dips: 3 sets of 8–12 reps.
Close-Grip Bench Press: 3 sets of 8–10 reps.
Overhead Dumbbell Tricep Extension: 3 sets of 10–12 reps.
Finisher (optional): Tricep Kickbacks or Rope Tricep Pushdowns for 3 sets to failure.
More Workout Programs
Now when it comes to incorporating dumbbell skull crushers into a workout program, you can find a pre-existing training program or create your own. Either way, Boostcamp can be your last stop for a great workout program. With over 50 free workout programs written by renowned coaches that cater to your goals, whether you are training fro strength, athleticism, or hypertrophy.
You also can use Boostcamp's Program Creator tool to create your own custom program that is tailored perfectly to your schedule, goals, and whatever other stipulations may have.
Regardless, you can track your workouts with Boostcamp!
Conclusion
The dumbbell skull crusher is an excellent exercise to include in your tricep workout routine, whether you're looking to build size, strength, or improve the aesthetics of your arms. It’s a versatile, joint-friendly alternative to the barbell version, and when performed with proper form and progressive overload, it can yield fantastic results. By understanding the correct technique and incorporating it into a well-rounded tricep training program, you can maximize your arm gains and push through plateaus effectively.
Be sure to follow Boostcamp on Instagram and subscribe on Youtube!

HEADER IMAGE COURTESY OF CAMERON CHASE

